Talking Tech: NetSuite Automatic Location Assignment
Let’s Talk Tech.
Accordion’s “Talking Tech” series explores how different CFO Technology solutions can empower finance functions to support organizational strategic initiatives – by implementing business process recommendations, optimizing operations, and capitalizing on value creation opportunities.
Now, let’s take a look at how the Automatic Location Assignment feature in NetSuite can help simplify and streamline the business fulfillment process.
As your company grows and requires more data entry, it can become burdensome and complicated to have your users manually determine which warehouses should be prioritized for fulfillment.
With the Automatic Location Assignment feature, NetSuite allows for fulfillment of locations automatically to each line on a Sales Order.
We will discuss how to set up this feature in NetSuite, how to best leverage it and some additional considerations that business should account for prior to implementing this feature.
Automatic Location Assignment Setup
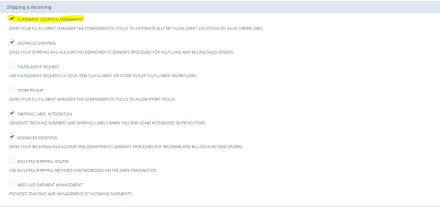
To enable Automatic Location Assignment, navigate to Setup > Company > Enable Features and under the ‘Transactions’ tab in the Shipping & Receiving section, select the feature and click Save.
After enabling the feature, there are a few more actions to configure Automatic Location Assignment:
- Create Automatic Location Assignment Configuration
- Create Automatic Location Assignment Rule(s)
- Maintain settings for Automatic Location Assignment
Once the necessary actions listed above are complete, NetSuite will be ready to run automation!
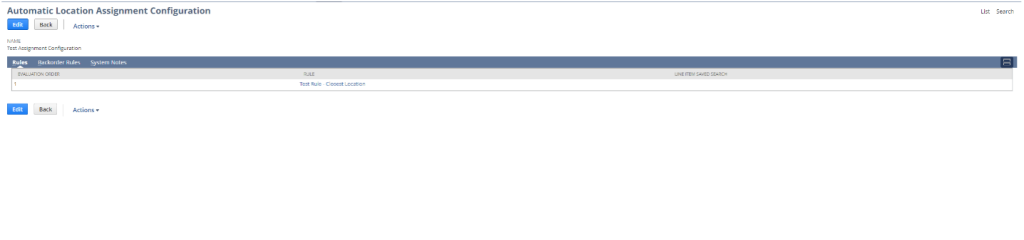
Creating an Automatic Location Assignment Configuration
The configuration record will house all the rules that are created for location assignment. To successfully run automation for location assignment, there must be at least one configuration with at least one rule assigned to it.
To create an Automatic Location Assignment Configuration, navigate to Setup > Order Management > Configurations > New.
To create a configuration, a name and location assignment rules are necessary. Optionally, backorder rules can be added that will apply to any inventory on backorder. Further explanation on that process is explained in the following section.
Creating Location Assignment Rules
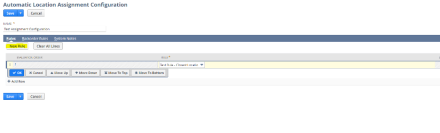
Automatic Location Assignment Rules are the engine that powers this feature to its fullest. The rules that get set up on the configuration will determine the way that NetSuite assigns locations to the lines on your Sales Orders. Rules are prioritized by the sequence in which they are entered on the configuration record, with the top rule having the highest priority.
To create a new rule, navigate to the configuration record in Edit mode and click on the ‘New Rule’ button within the Rules sublist.
Once ‘New Rule’ is selected, a popup window will appear, and the user will be prompted to select the criteria that will determine how locations are assigned on orders.
There are multiple criteria that can be leveraged to determine how the inventory is fulfilled:
- Line Items – A rule can either be applied to all line items on a Sales Order or specific lines based on criteria specified in a transaction saved search (i.e., using a search that limits lines to be assigned based on a specific department).
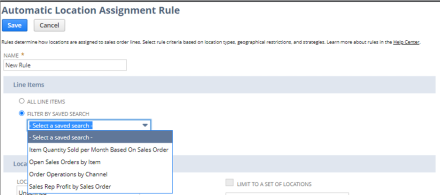
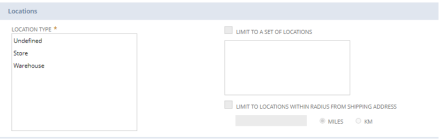
- Locations – These can be restricted by type (i.e., Warehouse or Store) as well as limit automatic assignment to a specific set of locations. Under this section, there is also the ability to limit locations to be assigned within a specific radius based on a warehouse or store location.
- Strategies –Either opt to use as few locations as possible by toggling the ‘Minimize Fulfillment Locations’ checkbox or select an optimal fulfillment strategy, choosing either the closest warehouse location to the customer or the highest ranked location.

Maintain Settings for Automatic Location Assignment
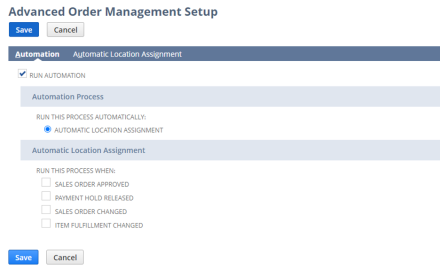
To determine when automation will run, update the automation settings on the Advanced Order Management Setup page. Navigate to Setup > Order Management > Advanced Order Management.
Under the ‘Automation’ tab, select the Automatic Location Assignment process that best suits the company’s needs.
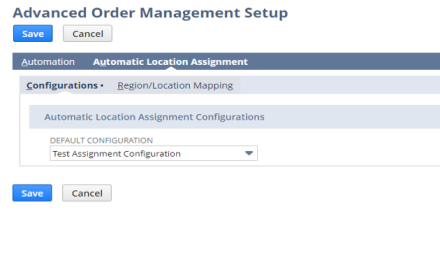
Under the ‘Automatic Location Assignment’ tab, select the desired default configuration. This is the configuration that NetSuite will use on Sales Orders by default.
Running Automation
Once configuration has been complete, automation is ready to run. To run automation, navigate to Setup > Order Management > Advanced Order Management and select the ‘Run Automation’ checkbox.
IMPORTANT NOTE: Automation will run immediately after selecting the checkbox and clicking Save. To pause automation, clear the ‘Run Automation’ checkbox and click Save.
Automatic Location Assignment can be a very powerful tool for business. While this is just a primer on all things related to the feature, there are additional opportunities to dig deeper into this functionality and use it to even greater degrees than described here.