Talking Tech: Guide to Setting Up NetSuite Integration Record
Meet the Author

Let’s Talk Tech.
Accordion’s “Talking Tech” series explores how different CFO Technology solutions can empower finance functions to support organizational strategic initiatives – by implementing business process recommendations, optimizing operations, and capitalizing on value creation opportunities.
Now, let’s take a look at each field on the NetSuite integration record as well as how to implement each authentication type as of release 2020.1.
The ability to allow external systems to securely integrate with NetSuite is an important requirement for successful implementation.
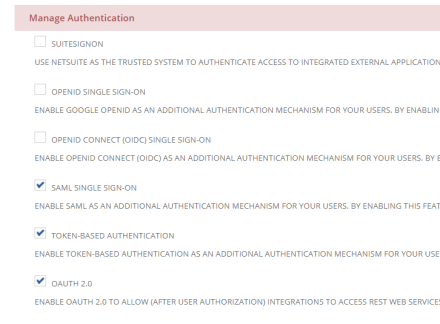
Enabling required NetSuite feature
There are a few steps that are needed before setting up the actual Integration record itself. Make sure that all features are enabled by navigating to Setup > Company > Enable Features. Under the SuiteCloud subtab, find the Manage Authentication field group and enable the Token-Based Authentication and OAuth 2.0 features.
You do not need to enable them both if you only want to use one of the authentication protocols. For the purposes of this article, we will enable both so that we can show you how to set up both Token-Based Authentication and OAuth 2.0.
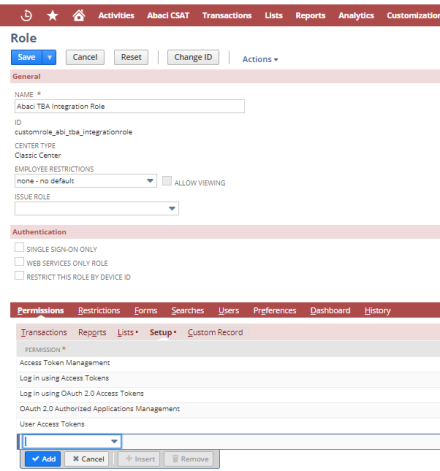
Set up a custom integration-specific role
NetSuite does not allow usage of the Administrator role for connection to NetSuite from external integrations. Below are steps to create a custom integration role.
- Navigate to Setup > Users/Roles > Manage Roles > New
- Give the role a descriptive name and ID, making it clear to other users what the role is used for.
- Set the necessary permissions, restrictions, and preferences needed for your Integration to properly function. For example: if your integration creates Transaction records, make sure to include that permission.
- As an extra security measure, only include the minimum number of permissions necessary for the integration to function.
- For Token-based Authentication, the Role’s permission set must also include the following under the Setup subtab:
- Access Token Management
- User Access Tokens
- Log in using Access Tokens
- For OAuth 2.0, the Role’s permission set must also include the following under the Setup subtab:
- OAuth 2.0 Authorized Applications Management
- Log in using OAuth 2.0 Access Tokens
IMPORTANT NOTE: As of Release 2021.1, user credentials authentication for newly created RESTlets will not be supported. This change will not affect RESTlets created before 2021.1, except for RESTlets included in bundles or SuiteApps that are installed into target accounts as of 2021.1 or later.
We highly recommend that you move away from using user credential authentication method moving forward.
Set up a custom Integration-specific Employee
For the purposes of this article, we will create a new employee record to to assign newly created integration role from above.
- Navigate to Lists > Employees > Employees > New
- Give the Employee a descriptive name and ID, making it clear to other users what the Employee is used for.
- Under the Access subtab, assign the newly created Integration Role.
IMPORTANT NOTE: All Integration user will count towards your available user licenses.
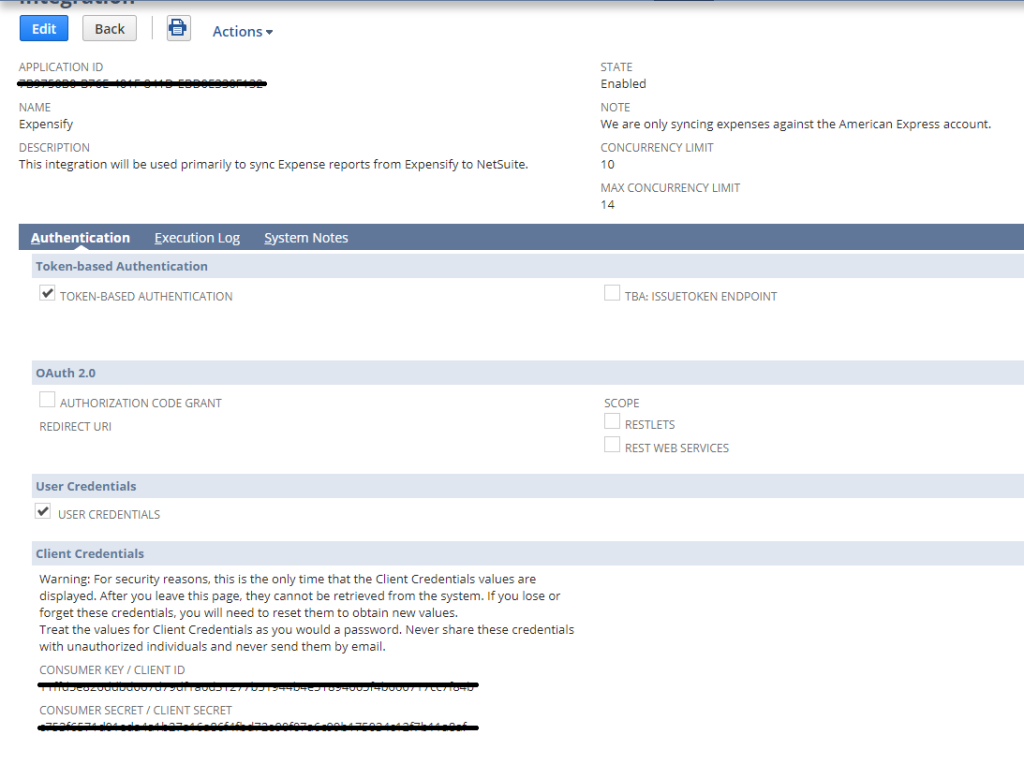
Integration Header creation

- Name: The user-friendly name of this Integration. Make sure that this value is obvious and descriptive, this is what we will use to identify the Integration when creating access tokens or assigning integration-specific employee records.
- Description: An optional description text area to define the purpose of the integration. This value can be bundled and distributed with the Integration record.
- State: The on/off switch for allowing connections via this Integration set up. If this value is set to Blocked or Waiting for Approval, it will disable any connections to NetSuite through this Integration. Only the Enabled state will allow connection to NetSuite.
- Note: An optional description text area to define the purpose of the integration specific to this NetSuite account only. This value cannot be bundled or distributed with the Integration record.
- Concurrency Limit: The number of concurrent requests that can be handled by this specific Integration and its related scripts or web service calls.
- Max Concurrency Limit: The maximum number of concurrent requests allowed by the system. As noted in the system notes, this value is always one less than the account’s available concurrency limit.
Upon save of the Integration record, NetSuite will generate the Consumer ID and Consumer Key values.
IMPORTANT NOTE: These will only be displayed once for security purposes, so be prepared to copy them over to a secure platform or document.
TIP: Remember to never send these values by email. Alternatively, you can use an application such as Keeper Security to securely share these credentials with others.
Token-based Authentication
The first field group of the Authentication subtab of the Integration record refers to three different methods of implementing Token-based Authentication.
TOKEN-BASED AUTHENTICATION
The first field group of the Authentication subtab of the Integration record refers to three different methods of implementing Token-based Authentication.
TOKEN-BASED AUTHENTICATION
The first method listed is the standard Token-based Authentication that uses tokens generated through the User Interface.
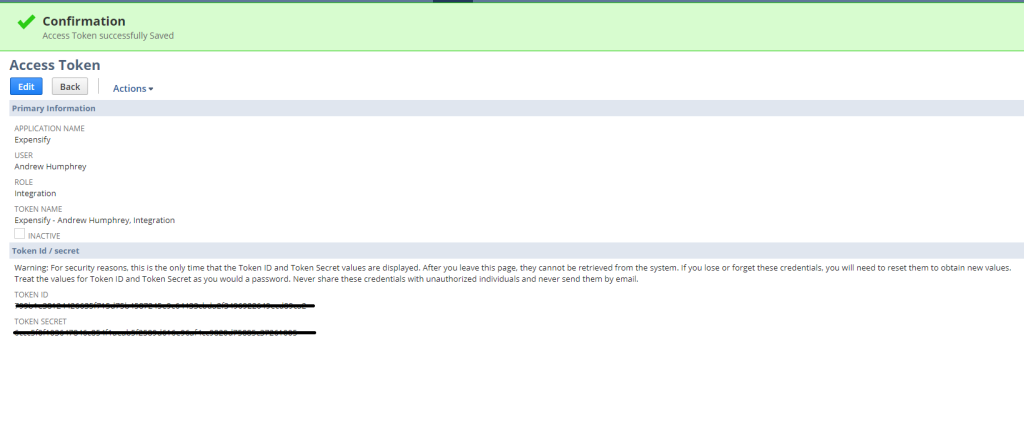
To generate a new token from the User Interface, navigate to Setup > Users/Roles > Access Tokens > New.
If you have created the Integration record with the Token-based Authentication check box checked, you should see it in the Application Name select field. Select your record, user, and role that were set up in the previous steps of this tutorial. A Token Name value will be auto-filled as you select these values.
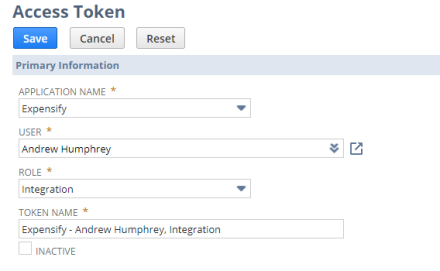
Once the Token is generated, it will display the unique Token ID and Token Secret values.
IMPORTANT NOTE: These will only be displayed once for security purposes, so be prepared to copy them over to a secure platform or document.
TBA: ISSUETOKEN ENDPOINT
The second method available is the Issue Token and Revoke Token REST service endpoint. This service allows you to call an account-specific domain endpoint using your Consumer Key to issue (and revoke) a Token programmatically. These tokens can only be generated for the user to which the Integration record is assigned.
Issue Token
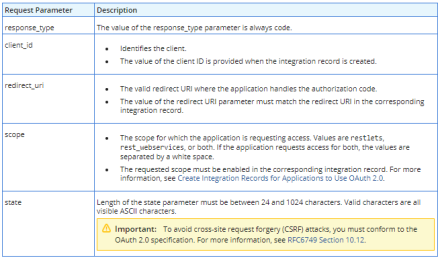
To issue a new token, a GET request with two URL encoded parameters will be made using the NLAuth Authorization header to connect to your account specific issue token endpoint URL. There are two different domains based on the context of your call, which can be found below:
RESTlet: https://[accountId].restlets.api.netsuite.com/
System: https://[accountId].app.netsuite.com
The first parameter is the Consumer Key value we created on save of the Integration record as in the example above. The Consumer Key is mandatory, it tells the system which Integration record the request is trying to issue an access token for.
The second parameter is a token name, this parameter is optional and should be used when re-issuing new credentials on an existing token. The final Issue Token GET request URL:
https://[accountId].restlets.api.netsuite.com/rest/issuetoken?consumerKey=&name=
The Issue Token endpoint is also compatible with Two-factor Authentication using the nlauth_otp header value. This is required when trying to issue or revoke a token for a role with elevated permission levels when 2FA settings are enabled.
Once the token is issued, it can be used in your integration in the same way as a token generated through the UI. If the token is being stored, make sure to make appropriate security considerations when building your solutions.
Revoke Token
Similarly, the Revoke Token endpoint uses a GET request with the NLAuth header as well as an account-specific domain endpoint using the Consumer Key. The first parameter is the Consumer Key value in the same format as the Issue Token endpoint.
The second parameter is also required and is the token value passed in from the issue request.
The final Revoke Token GET request to the endpoint:
https://[accountId].restlets.api.netsuite.com/rest/revoketoken?consumerKey=&name=
OAuth 2.0
The second field group of the Authentication subtab of the Integration record is for the new OAuth 2.0 framework. Currently, NetSuite only offers the Authorization Code Grant flow to enable client-side applications to connect to NetSuite. This type of grant flow requires user interaction and therefore cannot be completely automated.
To enable OAuth 2.0, click the Authorization Code Grant check box and populate your redirect URI. This redirect URI is the callback that will be passed the OAuth 2.0 token information once initial authentication has been accepted.
The advantage to using OAuth 2.0 as an alternative to Token-based Authentication is that the request does not need to be signed (oauth_signature parameter in the Authorization header).
OAuth 2.0 Integration fields
- Redirect URI: A URI value that the token issuing endpoint (NetSuite back-end) will redirect to on a callback function with the response to your request for a token. The URI will receive the success response with the associated token values for use with authentication into NetSuite. The URI is the resource that is responsible for handling the connection to NetSuite and will serve as your gateway to login, conversely it should also handle any error responses accordingly.
- RESTlets (Scope): A check box field determining if your OAuth 2.0 Integration can access RESTlet scripts using the tokens provided to it.
- REST Web Services (Scope): A check box field determining if your OAuth 2.0 Integration can access the new REST Web Services (release 2020.1) using the tokens provided to it.
- Application Logo: A reference to a file in the file cabinet that will be shown on the client-side consent screen to the user.
- Application Terms of Use: A reference to a Terms of Use PDF file in the file cabinet that will be shown on the client-side consent screen to allow users to accept before using your external application to perform operations within NetSuite.
- Application Privacy Policy: A reference to a Privacy Policy PDF file in the file cabinet that will be shown on the client-side consent screen to allow users to accept the review before using your external application to perform operations within NetSuite.
OAuth 2.0 Authorization Code Grant Flow
- The external, integrating application will trigger a GET request to the NetSuite OAuth 2.0 Authorization endpoint. This endpoint can be account specific or generic based on the needs of the application. Account-specific endpoint:
https://[accountId].app.netsuite.com/app/login/oauth2/authorize.nl
If the Account ID is not known, the generic endpoint can be used:
https://system.netsuite.com/app/login/oauth2/authorize.nl
- The GET request will trigger a consent screen for the user. This screen will include any specific branding to your company based on the optional Application Logo, Terms of Use, and Privacy Policy fields entered on the Integration record. The user will be prompted to Allow, Deny, or Change Role for the specific application to be authorized. If the user is not currently logged in to an active NetSuite session, they will first be redirected to the NetSuite log in form.
- After successful authorization of the Application with NetSuite (NetSuite active session + Allow button clicked by user), a request is sent back to the Redirect URI set up in your Integration record. If the application was successfully authorized, a code parameter is sent. If it is not authorized, an error parameter is sent. List of all request parameters sent back to the Redirect URI:
Application success request:
https://myapplication.com/netsuite/oauth2callback?state=ykv2XLx1BpT5Q0F3MRPHb94j&role=1000&entity=12&company=1234567&code=70b827f926a512f098b1289f0991abe3c767947a43498c2e2f80ed5aef6a5c50
Authorization denied request:
https://myapplication.com/netsuite/oauth2callback?state=ykv2XLx1BpT5Q0F3MRPHb94j&role=1000&entity=12&company=1234567&error=access_denied
- Now your application is ready to POST to the OAuth 2.0 token endpoint. This is very similar to requesting a token using TBA Issue Token Endpoint flow, except you do not need to sign a request signature.You will use the code returned by the previous step as well as the redirect URI in a POST request to the OAuth 2.0 token endpoint below:
https://[accountId].suitetalk.api.netsuite.com/services/rest/auth/oauth2/v1/token
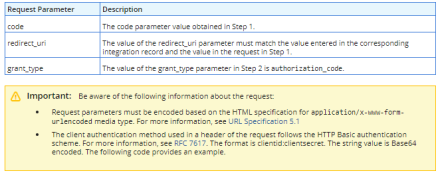
Application Success/Deny Parameter Details The response of a successful call to this endpoint will be your access token, the expiration time in seconds, and the refresh token. The refresh token is the value that can be used to authenticate authorized applications by granting a new token upon request to the refresh token endpoint.

Response JSON Detail For more information about refreshing tokens, see SuiteAnswer ID: 91341
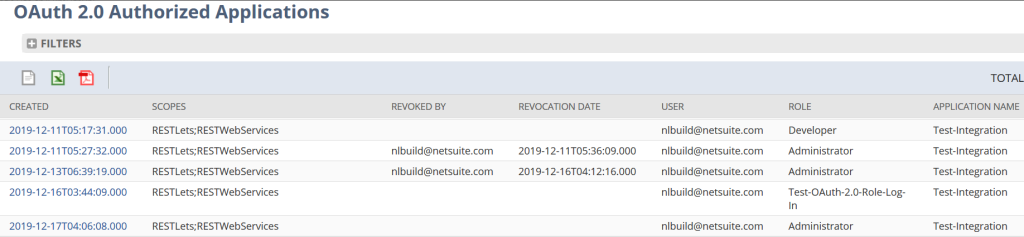
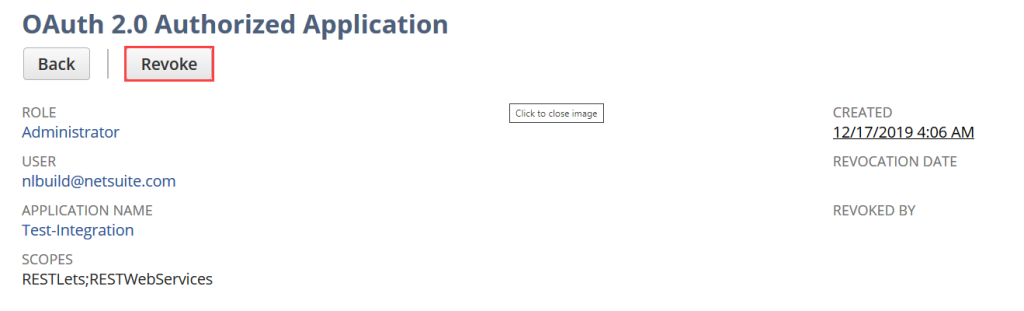
OAuth 2.0 Authorized Applications Interface
With the release of the OAuth 2.0 Authorization Code grant framework, NetSuite has also added an interface where authorized users within NetSuite can view all of the OAuth 2.0 Authorized Applications in the account and also view the details of each. This interface also allows the user to revoke access to these applications in their entirety (across all user Access Tokens).
If you have questions on setting up integration to or from NetSuite, we’d love to connect.